I recently acquired 4 Intel NUC devices, and have configured them as a compute cluster for various tasks.
EDIT: see the updates article for the latest updates, including why I switched away from Proxmox and Ceph to Harvester and Longhorn.
My goals for setting up the cluster:
make everything (within reason) declarative and easily reproducible
make sure at least one drive can die without causing data loss
Most of the workloads I want to support on the cluster run in Kubernetes (k8s). I started out with k8s on bare-metal using k3os, which worked wonderfully. However, I was worried about the 110 pods/node limit, and wanted to make virtual machines first-class citizens with VLANs and other networking setups that were hard to replicate in KubeVirt. For these reasons, I moved to Proxmox on the metal, with VMs for k8s nodes, which are managed by Rancher. Rancher makes it very easy to use any docker-machine driver to create VMs across infrastructure providers, and provision them with k3s or RKE, two different k8s distributions created by Rancher.
Setting up Proxmox
Setting up Proxmox is a breeze – even configuring a Ceph cluster for shared storage among nodes was made simple by the Proxmox UI. I wasn’t too concerned with setting up PXE / custom Proxmox images here since this is more of a “set-it-and-forget-it” setup that will host the actual workloads in VMs, which will follow goal #1 from above of being declarative and reproducible.
A lot of the proxmox setup has to do with hardware-specific configuration anyway. If in the future I need to redeploy onto new hardware or for any other reason, I can configure Proxmox with the hardware-specific configuration, and then use the declarative configs for installing Rancher and the k8s workloads.
Important things to remember during Proxmox configuration
Turn off the enterprise repository and turn on the pve-no-subscription repository to continue getting updates for Proxmox components. This needs to be done for all nodes.
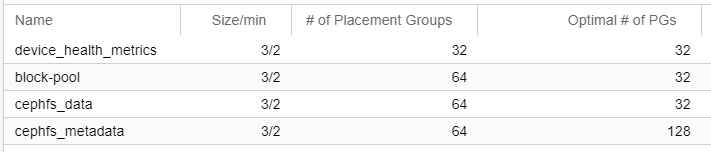
In order to host both files (ISOs and CT templates) and block storage (VM and CT disks), you must create a standard ceph pool for block storage, and configure CephFS for file storage. Make sure to also configure an odd number of metadata servers for CephFS and keep placement groups (PGs) to around 100 per OSD (summing all the pools that that OSD is going to be a part of). Ceph has a handy calculator for number of PGs.
In my case, my pools are configured as follows:
This leaves me with 224 PGs total, and I have 4 OSDs in my cluster (one drive on each node). That’s 56 PGs per node, so I still have room to add more pools or allocate more PGs in the future.
Setting up a bootstrap k8s cluster
In order to make k8s cluster creation on Proxmox simpler, I decided to use Rancher to bootstrap the cluster VMs.
To start using Rancher to set up Kubernetes cluster, we first need to set up a Kubernetes cluster to run Rancher inside of…1
So I started by creating an Ubuntu VM (henceforth the “bootstrap VM”) on Proxmox, installing Docker, and then got to setting up a kind cluster inside of Docker.
kind lets you get going with a kubernetes cluster whose nodes are docker containers on the system.
After installing kind, setting up the local cluster was as easy as kind create cluster. I then waited a few minutes, and was able to use kubectl to see the kind node:
kyle@bootstrap:~$ kubectl get no
NAME                 STATUS   ROLES                  AGE     VERSION
kind-control-plane   Ready    control-plane,master   3d18h   v1.21.1
At this point, the kind cluster is ready to have Rancher installed on it.
# Install cert-manager
kubectl apply -f https://github.com/jetstack/cert-manager/releases/download/v1.5.1/cert-manager.crds.yaml
helm repo add jetstack https://charts.jetstack.io
helm repo update
helm install cert-manager jetstack/cert-manager --namespace cert-manager --create-namespace --version v1.5.1

# Install rancher -- make sure to change the hostname here to match your bootstrap VM
helm repo add rancher-latest https://releases.rancher.com/server-charts/latest
helm repo update
helm install rancher rancher-latest/rancher --namespace cattle-system --create-namespace --set hostname=bootstrap.home.kylesferrazza.com --set replicas=1
To make the Rancher service accessible from the network (outside of the kind cluster), I did the following on the bootstrap VM:
set up MetalLB to give out LoadBalancer IPs: kindprovides directions for setting up MetalLB
kubectl -n cattle-system patch svc rancher -p '{"spec": {"type": "LoadBalancer"}}' patches the Rancher service type to LoadBalancer so that it can obtain a Load Balancer IP from MetalLB
determine the assigned load balancer IP with echo $(kubectl -n cattle-system get svc rancher --output jsonpath='{.status.loadBalancer.ingress[0].ip}'), in my case, 172.18.0.200
ensure the load balancer IP is reachable on the bootstrap machine: curl -k https://172.18.0.200
set up Caddy to reverse proxy from the bootstrap VM on ports 443 and 80 to the Load Balancer IP for the Rancher service.
my Caddyfile looks like this, including a DNS challenge against Cloudflare to get a trusted TLS cert from LetsEncrypt:
After all of that setup, I am able to hit https://bootstrap.home.kylesferrazza.com from any machine on my local network and access Rancher, with a valid TLS configuration:
Using Rancher to provision a k8s workload cluster
Rancher’s “Cluster Management” feature makes setting up a k8s cluster on Proxmox as simple as filling a web form with some options.
In order for Rancher to know how to create machines on your infrastructure provider of choice (Proxmox, in this case), it needs a docker-machine driver.
Luckily, lnxbil on GitHub has provided one for us.
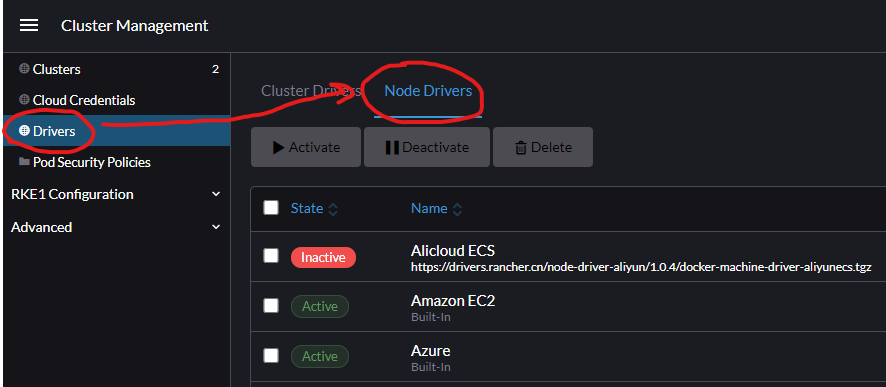
In the bootstrap Rancher cluster, go to “Cluster Management” in the hamburger menu at the top left.
Then choose “Drivers” on the tab on the left side of the page, followed by the “Node Drivers” tab at the top:
Click “Add Node Driver”, and fill in the download url of the latest release of the docker-machine-driver-proxmox-ve project. For version 4, that is https://github.com/lnxbil/docker-machine-driver-proxmox-ve/releases/download/v4/docker-machine-driver-proxmoxve.linux-amd64.
After adding the Node Driver, ensure it is Active (or activate it using the Activate button on the Node Drivers page).
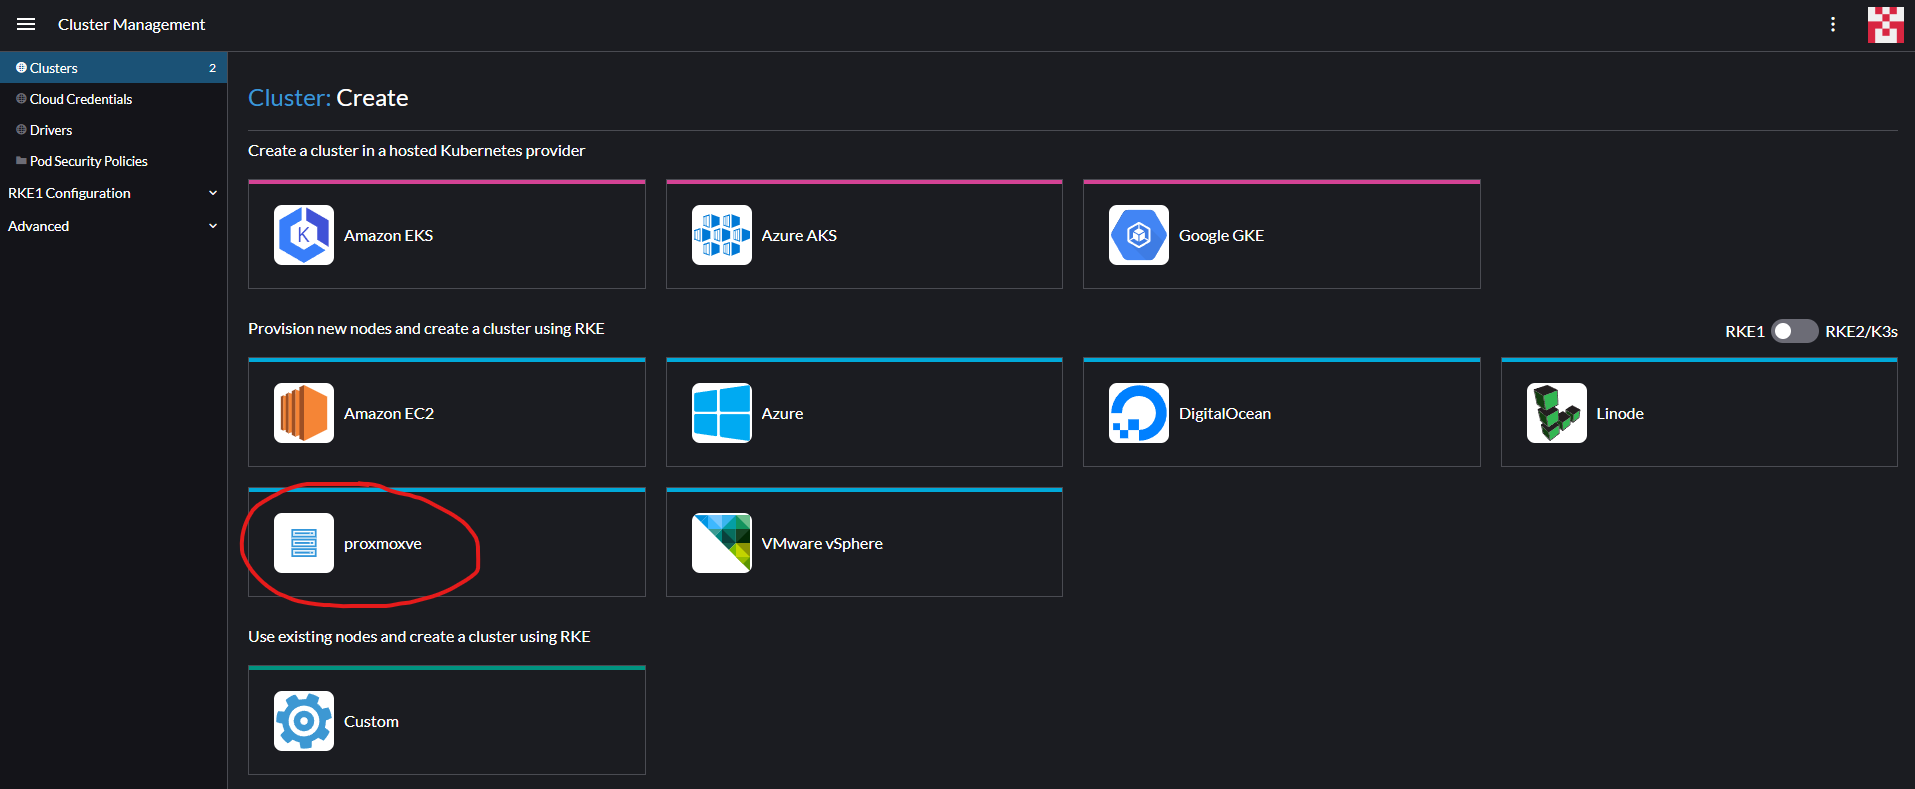
Now you can go to the Clusters tab on the left, and you should see proxmoxve as an option for node provisioning, like this:
You can then configure a “node template” to tell the driver how to create VMs in Proxmox.
Read more about the options passed to the docker-machine driver on its README, including how to set up a user for authentication.
I tried the “clone” provisionStrategy but did not have much success, so I switched to the “cdrom” strategy with a RancherOS ISO downloaded to my ISO storage in Proxmox, and it works wonderfully.
After the node template is set up with credentials and the hostname for your Proxmox setup, it’s just one click to create a cluster using that template.
I recommend starting with a single-node cluster to test for issues with the driver configuration, and then deleting it and spinning up larger clusters as necessary.
Deleting clusters in the Rancher UI also deletes the associated VMs that it created.
Results
Now that Proxmox and Rancher are set up, and the Node Template is created, setting up new k8s clusters for different workloads or users is a breeze, and can be done by just clicking a few buttons in the Rancher UI.
Next steps
Ideally, I would like to set up the bootstrap cluster in a more declarative way, perhaps using Terraform and Ansible to set up and configure the Ubuntu VM, kind, and Caddy.
That way, if something were to go wrong with the bootstrap VM, I could just recreate it with a single terraform apply.
I tried setting up Rancher using the docker install method, but started getting weird errors and infinite restarts. After some Googling, turns out Rancher-in-docker gets pretty annoyed if the storage it is running on is a little slow. I decided to stop trying to debug this simpler method for installing Rancher, and to set up k8s in docker using kind instead, and then install Rancher on top of that kind cluster. ↩︎